Grilling whole fish is not just a cooking method; it’s a gastronomic experience that transports you from the kitchen to the heart of coastal cuisine. Imagine the aroma of a fresh catch sizzling on the grill, the sounds of crackling skin, and the vibrant colors of the beautifully charred fish complementing a summer gathering. Whether you’ve just returned from a spearfishing trip or purchased fish from your local market, grilling it whole allows for an unparalleled flavor and texture that enhances the natural richness of the fish. This complete guide will provide you with the essential techniques, tips, and tricks needed to grill whole fish to perfection. By the end, you’ll be well-equipped to impress family and friends with a dish that looks stunning and tastes exquisite.
Ingredient/Component Selection Criteria
Choosing the right fish is crucial for achieving the best grilling results. The selection process involves several key considerations:
- Freshness: Freshness is paramount when it comes to grilling fish. Always opt for the freshest fish available, as this directly influences the flavor and texture of the final dish. Look for fish with clear eyes, bright red gills, and a pleasant, ocean-like smell. For instance, a fish that smells overly fishy or has cloudy eyes is an indication that it’s not fresh. Consider visiting local fish markets rather than grocery stores for the best catch of the day.
- Type of Fish: Certain fish varieties are more suited for grilling whole due to their size and texture. Popular choices include snapper, trout, branzino, and mackerel. These varieties not only hold up well on the grill but also have flavors that enhance when cooked over an open flame. For example, branzino has a delicate flavor and skin that crisps beautifully, making it a favorite among chefs and home cooks alike.
- Size: The size of the fish plays a significant role in the grilling process. Ideally, choose fish that weigh around 1-3 pounds for even cooking. Larger fish can be tricky to manage on the grill, as they may not cook evenly and can be cumbersome to flip. A 2-pound fish is typically perfect; it provides enough meat for a satisfying meal while being manageable on the grill.
- Whole vs. Fillet: While fillets are popular, grilling whole fish is recommended for better moisture retention and enhanced flavor. The skin acts as a protective barrier, keeping the fish juicy and flavorful. Additionally, grilling whole allows for creative presentation, making it a show-stopping centerpiece on your dining table.
Required Tools and Equipment
Gathering the right tools and equipment is essential for a successful grilling experience. Here’s what you’ll need:
- Grill: A charcoal or gas grill works wonderfully for grilling whole fish. Ensure your grill is large enough to accommodate the fish without crowding, which can lead to uneven cooking. A grill with adjustable heat zones can also be beneficial for managing flare-ups and cooking at different temperatures.
- Grill Basket or Fish Grill Rack: A grill basket or specialized fish rack is crucial to keep the fish intact while cooking. These tools allow for even heat distribution and prevent the fish from falling apart when flipping. If you don’t have a grill basket, consider using a piece of heavy-duty foil as a makeshift option, folding the edges up to create a barrier.
- Spatula: A wide spatula is essential for flipping the fish without breaking it. Opt for a spatula with a long handle to keep your hands away from the heat, and ensure it’s large enough to support the fish’s weight for an easy and gentle turn.
- Cooking Brush: A cooking brush is useful for applying oil or marinade to the fish. This step not only adds flavor but also helps prevent sticking. Consider using a silicone brush for easy cleaning and durability, especially when working with marinades.
- Thermometer: A digital meat thermometer is indispensable for ensuring perfect doneness. Fish should reach an internal temperature of 145°F at the thickest part. This tool helps take the guesswork out of cooking and ensures food safety.
- Aluminum Foil: Keep aluminum foil handy for easy cleanup and to help retain moisture during cooking. You can create a foil tent to cover the fish if it starts to brown too quickly, ensuring it cooks evenly without drying out.
Preparation Timeline and Planning
Proper preparation is crucial for a seamless grilling experience. Here’s a suggested timeline to help you plan effectively:
- 1 Day Before: Purchase your fish and any additional ingredients, such as herbs, spices, or marinades. If possible, try to buy your fish the day before grilling to allow for any necessary marinating or seasoning time. This also gives you the opportunity to choose the freshest fish available, ensuring the best flavor.
- 4 Hours Before Grilling: Clean and gut the fish if this hasn’t been done by your fishmonger. Rinse thoroughly under cold water, removing any scales and internal organs, and pat dry with paper towels. Proper cleaning is essential, as it helps remove any unwanted flavors and prepares the fish for seasoning.
- 2 Hours Before Grilling: Marinate the fish or season it generously with salt, pepper, and fresh herbs. Allow the fish to sit at room temperature for about 30 minutes to 1 hour before grilling. This resting period enables the fish to absorb flavors and ensures more even cooking.
- 30 Minutes Before Grilling: Preheat your grill to medium-high heat, around 375°F to 450°F. Prepare your grilling tools, ensuring the grates are clean and well-oiled to prevent sticking. An adequately preheated grill is vital for achieving that perfect sear and preventing the fish from adhering to the grates.
Step-by-Step Detailed Instructions
1. Cleaning and Preparing the Fish
Start by cleaning the fish thoroughly. Rinse it under cold water, ensuring that you remove any scales and gut the fish if necessary. Pay close attention to the cavity, where residual blood or organs can affect the flavor. Pat the fish dry with paper towels; this step is critical because moisture on the surface can inhibit the searing process, preventing a crispy skin. A well-prepared fish will have a firm texture and will hold its shape during cooking.
2. Seasoning the Fish
Season the fish inside and out to enhance its natural flavors. A simple mixture of salt, pepper, and fresh herbs like parsley or dill works beautifully. For an added flavor boost, stuff the cavity with slices of lemon, garlic cloves, or aromatic herbs like thyme and rosemary. This not only infuses the fish with delicious flavors but also helps keep it moist during cooking. Consider using a flavor injector for deeper penetration of marinades, especially if you’re using more robust flavors.
3. Preheating the Grill
Preheat your grill to medium-high heat, aiming for a temperature of about 375°F to 450°F. Make sure the grates are clean and well-oiled to prevent sticking. Oiling the grates can be done by taking a paper towel soaked in vegetable oil and using tongs to wipe the grates. Proper preheating allows for a quick sear, locking in moisture and flavor. A grill thermometer can help you monitor the temperature accurately, ensuring optimal cooking conditions.
4. Grilling the Fish
Place the fish on the grill, either directly on the grates or in a grilling basket. Grill the fish for about 6-8 minutes per side, depending on its thickness. The general rule is to grill fish for about 10 minutes for every inch of thickness. Use a wide spatula to carefully flip the fish halfway through cooking. This technique helps to maintain the fish’s integrity and prevents it from falling apart. If you notice flare-ups, move the fish to a cooler part of the grill to avoid burning.
5. Checking for Doneness
The fish is done when the flesh turns opaque and flakes easily with a fork. A digital thermometer should read 145°F at the thickest part of the fish. To test for doneness without a thermometer, insert a fork at the thickest part; if the fish flakes easily, it’s ready to be removed from the grill. Keep in mind that fish continues to cook slightly even after being removed from the grill due to residual heat, so consider taking it off just before it reaches the exact target temperature.
Quality Indicators and Checkpoints
To ensure your grilled fish is of the highest quality, keep these indicators in mind:
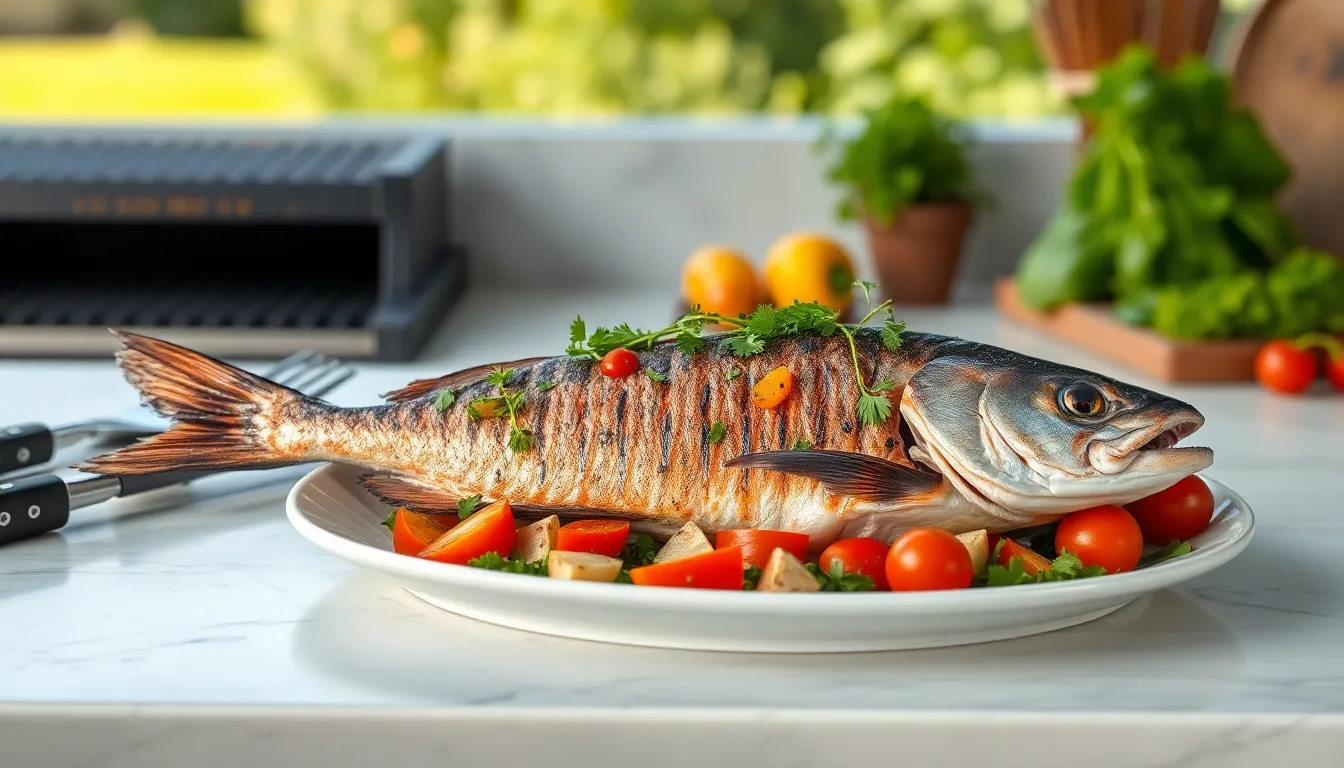
- Color: The flesh should transition from translucent to opaque as it cooks. This visual change not only indicates doneness but also enhances the presentation of the dish. Pay attention to the skin, which should have a golden-brown hue, showcasing that it has crisped up beautifully.
- Flakiness: The fish should flake easily with a fork, which is a sign that it’s cooked through and tender. If the flesh resists flaking, it’s likely undercooked. The perfect flakiness indicates that the protein fibers have separated optimally, resulting in a tender bite.
- Internal Temperature: Always check that the fish reaches an internal temperature of 145°F. Using a meat thermometer is the most reliable method for achieving food safety, especially with thicker fish. This ensures that harmful bacteria are eliminated while keeping the fish moist.
- Skin Texture: The skin should be crispy and slightly charred, adding a delightful texture and flavor contrast to the tender flesh beneath. Achieving this crispy skin often requires high heat and proper oiling of the grates, so don’t skip this step!
Serving, Presentation, or Finishing Tips
Once your fish is grilled to perfection, it’s time to serve it:
- Presentation: Serve the fish whole on a large platter, garnished with fresh herbs, lemon wedges, and perhaps a drizzle of high-quality olive oil. Consider adding seasonal vegetables or a colorful salad to create a vibrant, inviting display. The visual appeal of a whole fish can elevate the dining experience, making it a centerpiece that draws guests in.
- Accompaniments: Pair your grilled fish with a light salad, grilled vegetables, or a refreshing salsa. Consider a tangy mango salsa or a zesty chimichurri to complement the fish. These sides not only enhance the meal but also balance the flavors and textures on the plate.
- Finishing Touch: A sprinkle of flaky sea salt just before serving enhances the flavor and adds a crunchy texture. You can also add a squeeze of fresh lemon juice to brighten the dish. This final touch can bring all the flavors together and make the meal more memorable.
Storage, Preservation, or Maintenance
If you find yourself with leftovers, following these tips for storage will help maintain the quality of your grilled fish:
- Refrigeration: Store grilled fish in an airtight container in the refrigerator for up to 2 days. To retain moisture, consider placing a damp paper towel inside the container. This can help prevent the fish from drying out, keeping it flavorful for your next meal.
- Freezing: If you wish to store the fish for a longer period, wrap it tightly in plastic wrap followed by aluminum foil, and freeze for up to 3 months. When you’re ready to enjoy it again, thaw the fish in the refrigerator overnight before reheating. Be careful not to refreeze fish that has already been thawed, as this can compromise its quality.
Variations and Customization Options
Feel free to experiment with different flavors and techniques to personalize your grilled fish experience:
- Marinades: Try different marinades to infuse new flavors into the fish. A soy sauce and ginger marinade can impart an Asian flair, while a citrus marinade with lime and orange juice offers a bright, zesty kick. Marinating for at least 30 minutes can enhance flavor absorption, making each bite more tantalizing.
- Herb Blends: Use different herbs like cilantro, rosemary, or thyme to change the flavor profile. Fresh herbs not only add flavor but also contribute to the aromatic experience while grilling. Consider creating a herb paste using olive oil and garlic for a robust flavor infusion.
- Stuffing Options: Experiment with various stuffing options like olives, capers, or even spicy chorizo for a bold twist. Stuffing the fish can add layers of flavor and a unique culinary experience. For example, Mediterranean-style stuffed fish with tomatoes and olives can transport your taste buds to the coast of Italy.
Conclusion: Mastering the Art of Grilling Whole Fish
Grilling whole fish is an art that combines technique, flavor, and presentation. By selecting the freshest fish, using the right tools, and following the detailed steps outlined in this guide, you can create a dish that is not only delicious but also visually stunning. Remember to pay attention to quality indicators like color, flakiness, and internal temperature to ensure your fish is perfectly cooked. With practice, you’ll refine your skills and be able to customize your grilling process to suit your taste preferences. The next time you find yourself with a whole fish, don’t hesitate—fire up the grill and let your culinary creativity shine. Your family and friends will be eager to gather around the table to enjoy your flavorful creations!